
WinSnort Auto-Installers for the WinIDS
5 files
-
=============================================================================== WinIDS v4.1 Deployment Framework – Remote Node & Host Conversion Install Guide Copyright © 2026 WinSnort.com | Michael Steele =============================================================================== Operational Overview
This toolkit provides the instructions required to convert a standalone sensor into a Master Host and it also facilitates the deployment of a WinIDS Remote Node. This architecture will enable decentralized packet inspection paired with centralized logging to either a PostgreSQL or MySQL database.
Architectural Prerequisites
• Active Instance : A functional Standalone WinIDS Sensor is required. • Node Conversion : This process upgrades a Standalone Sensor to a Master Management Server role and initializes the Remote Node environment. Phase I: Pre-Deployment Specifications
• Target Environment : Optimized for clean OS installations. • Archive Integrity : Extract all package contents to a dedicated directory. • Archive Security : w1nsn03t.c0m Phase II: Master Server Provisioning
To allow inbound database traffic, the Master Management Server must be provisioned prior to remote node initialization. Ensure you have the Remote Node IP address ready before beginning.
Access the $WinIDSRoot\tools directory on the Master Host.
Right-click InitializeNode.exe and select Run as Administrator. From the menu options, press the A key to add an IP, and enter the IP address of the remote node at the input prompt.
Technical Impact: This utility automates Windows Firewall scoping and configures database permissions for the specified $RemoteIP.
Upon completion, the executable will display the configuration details required for the remote node setup.
>>> REMOTE NODE CONFIGURATION DETAILS Use the following settings on Remote Node (redacted) ------------------------------------------------------------ [•] Master Host Database Username: (redacted) [•] Master Host Database Password: (redacted) [•] Master Host IP Address : (redacted) [•] MySQL Host Database Port : (redacted) ------------------------------------------------------------ [SUCCESS] Configuration complete. Press any key to return to menu... The values displayed will include the Master Host Database Username, Master Host Password, Master Host IP Address, and MySQL/PostgreSQL Host Database Port.
Record these values; they are required for Phases III and IV of this guide.
Note: Run this process to add each new remote node.
Phase III: Connectivity & Validation
Perform these steps on the Remote Node. You will need the Master Host IP and Database Port recorded during Phase II.
Note: This step only verifies the connection from the Node to the Host.
Navigate to the remote node and access its local extraction directory.
Right-click Node2Host.exe, select Run as Administrator, and enter the IP address of the Master Host. Next, it will prompt for the Database port. If using the default port, press Enter to initiate an automated port scan. If using a custom port, type the port number and press Enter.
CRITICAL: Connection verification is mandatory. If the handshake fails, troubleshoot the network path before proceeding to Phase IV.
Phase IV: Remote Sensor Deployment
Locate the config.conf file in the remote node extraction directory, open it with a text editor (such as Notepad), and configure the following variables:
$TempDir = "" # Path for temporary installation/download files (e.g., "D:\files") $WinIDSRoot = "" # Primary home directory for WinIDS installation (e.g., "D:\home") $Oinkcode = "" # Your 40-character Snort.org Oinkcode for rule updates $SensorName = "" # Unique name for this node sensor (e.g., "NodeName") $EnableAllRules = $true # Set to $false to disable rule testing and high-volume logging $EnableRestorePoint = $true # Set to $false to skip System Restore point creation Input the SnortUser and SnortPass acquired in Phase II. This establishes the connection between Barnyard2 and the host database.
$SnortUser = "" # Master Host ALERT Database Username $SnortPass = "" # Master Host ALERT Database Password Input the MasterHostIP and MasterHostPort acquired in Phase II. This establishes the network link between the remote node and the master host.
$MasterHostIP = "" # Master Host IP Address (e.g., "192.168.1.50") $MasterHostPort = "" # Master Host Database Port (e.g., "3306") Save all changes to config.conf and close the editor.
Right-click Installer.exe and select Run as Administrator to begin the installation.
Deployment Duration Estimates
Completion times vary based on the selected database engine and host operating system. The following estimates assume standard network throughput and hardware resource availability:
Workstation (standalone or node deployments): ~15 minutes Server host deployments: ~40 minutes Performance is directly influenced by available system resources and network bandwidth.
Recovery and Resiliency Logic
The WinIDS framework is designed with automated resume capability. In the event of a package acquisition failure, manually download the required asset to your defined $TempDir and re-initialize the installer. The framework will automatically detect the local file and resume deployment.
Important: Do not terminate the installer during active system modifications or registry updates to prevent system corruption.
System Restore Operations
In workstation environments, when EnableRestorePoint is active, the installer generates a system restore point prior to setup. This process initializes the required snapshot services, clears existing restore points, and creates a fresh baseline snapshot before cycling the services back to manual. This specific sequence ensures the first-run pre-installation snapshot remains protected from automatic purging.
If a valid first-run snapshot is already present—often the result of a previous removal via the RestorePoint utility—the installer will bypass the creation step to preserve the original baseline for the new installation.
System Recovery Process
The RestorePoint utility relies on the initial first-run snapshot to execute a rollback. If this snapshot is detected, the utility will revert the system to its original pre-installation state. If the snapshot is missing, the process will automatically terminate to prevent system instability.
Without a valid snapshot, a clean rollback cannot be performed. In this scenario, you must manually resolve the conflict, restore from a full system backup, or initiate a fresh installation. Note that while the recovery process leaves $WinIDSRoot and $TempDir untouched, performing a new installation will permanently delete all data within the $WinIDSRoot directory.
Data Integrity
The System Restore feature is intended for configuration recovery and is not a replacement for a comprehensive backup solution. System Restore services are set to manual and toggled as needed. Windows Restore Points are transient and may be purged during routine maintenance cycles if those services are running.
Environmental Constraints & Best Practices
Server Deployments: Windows Server architectures do not natively support System Restore points. This feature is automatically bypassed during server OS deployments.
PulledPork Rule Maintenance
The original PulledPork by Shirkdog is housed within a sophisticated wrapper, accessible via the WinSnort Start Menu. While the utility is designed for out-of-the-box functionality with no manual configuration required, the wrapper offers a highly verbose interface with integrated system checks. Every update attempt is documented in the PulledPork log folder. To maintain system stability, the utility automatically rolls back to the last known-good rule set if an update fails.
The Rule Updater includes a built-in scheduler with configurable intervals ranging from 15 to 60 minutes. It supports automated retention of successful updates and SMTP email notifications. While Silent Mode is available for remote or unmanaged sensors, the updater defaults to a verbose display if launched manually from the desktop while in Silent Mode. If executed in Silent Mode without SMTP, the system continues to capture errors and failures within the local log files.
Phase V: Post-Deployment Management
Upon successful completion, the WinIDS Management Suite will be accessible via Start Menu > WinSnort. Core utilities include:
• Rules Updater : PulledPork-driven rule-set synchronization. • System Restore : System Restore Point (SRP) utility (workstation only). Although a system reboot is not strictly mandatory, it is recommended to ensure all environment variables are refreshed. Please note that the WinSnort Start Menu group may not appear in the Start Menu hierarchy until a system restart has been completed.
Phase VI: Post-Deployment Verification
Management Server Validation:
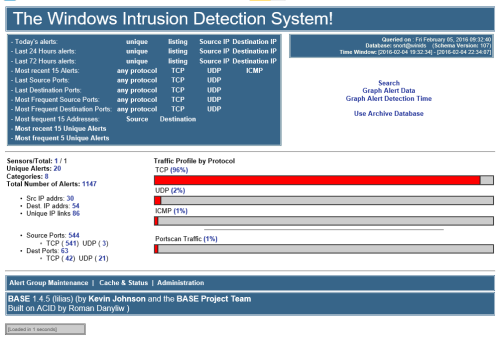
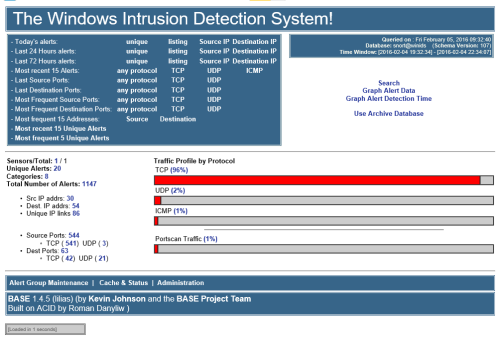
Launch the WinIDS Console on the Master Management Server. Monitor the Sensors/Total telemetry indicator. A successful link displays 2/2 (or greater). Verify that $SensorName is actively reporting logs to the centralized dashboard. =============================================================================== TECHNICAL DOCUMENTATION & SUPPORT: https://winsnort.com ===============================================================================- 8 Downloads
Updated -
=============================================================================== WinIDS v4.1 Deployment Framework – Standalone Sensor Install Guide Copyright © 2026 WinSnort.com | Michael Steele =============================================================================== Operational Overview
This package contains a specialized deployment framework for the Windows Intrusion Detection System (WinIDS). It is engineered for high-performance installations on Windows 10/11 and Windows Server (2016–2025) 64-bit.
Phase I: Pre-Deployment Specifications
• Target Environment : Optimized for clean OS installations. • Archive Integrity : Extract all package contents to a dedicated directory. • Archive Security : w1nsn03t.c0m Phase II: Standalone Sensor Deployment
Locate the config.conf file in the local extraction directory on the host.
Open it with a text editor (such as Notepad) and configure the following variables:
$TempDir = "" # Path for temporary installation/download files (e.g., "D:\files") $WinIDSRoot = "" # Primary home directory for WinIDS installation (e.g., "D:\home") $Oinkcode = "" # Your 40-character Snort.org Oinkcode for rule updates $SensorName = "" # Unique name for this host sensor (e.g., "HostName") $EnableAllRules = $true # Set to $false to disable rule testing and high-volume logging $EnableRestorePoint = $true # Set to $false to skip System Restore point creation $SnortUser = "snort" # Master host ALERT database username $SnortPass = "l0gg3r" # Master host ALERT database password $RootUser = "root" # Master host (root) MySQL/PostgreSQL database username $RootPass = "d1ngd0ng" # Master host (root) MySQL/PostgreSQL database password Save all changes to config.conf and close the editor.
Right-click Installer.exe and select Run as Administrator to begin the installation.
Phase III: Parameter Configuration
Security Recommendations
The username and password values shown above are defaults. For production environments, it is strongly advised to update these credentials to enhance network security. If there is any doubt, leave them as-is.
Database Roles
The SnortUser/SnortPass credentials are used by Barnyard2 to authenticate with the ALERT database. These credentials also facilitate the connection between remote nodes and the master host across the LAN or WAN.
The RootUser/RootPass credentials are administrative and used for command-line database management post-installation, as well as for the Database Manager utility.
Documentation
Use caution when modifying default settings. Ensure all changes are recorded for future administrative reference.
Deployment Duration Estimates
Completion times vary based on the selected database engine and host operating system. The following estimates assume standard network throughput and hardware resource availability:
Workstation (standalone or node deployments): ~15 minutes Server host deployments: ~40 minutes Performance is directly influenced by available system resources and network bandwidth.
Recovery and Resiliency Logic
The WinIDS framework is designed with automated resume capability. In the event of a package acquisition failure, manually download the required asset to your defined $TempDir and re-initialize the installer. The framework will automatically detect the local file and resume deployment.
Important: Do not terminate the installer during active system modifications or registry updates to prevent system corruption.
System Restore Operations
In workstation environments, when EnableRestorePoint is active, the installer generates a system restore point prior to setup. This process initializes the required snapshot services, clears existing restore points, and creates a fresh baseline snapshot before cycling the services back to manual. This specific sequence ensures the first-run pre-installation snapshot remains protected from automatic purging.
If a valid first-run snapshot is already present—often the result of a previous removal via the RestorePoint utility—the installer will bypass the creation step to preserve the original baseline for the new installation.
System Recovery Process
The RestorePoint utility relies on the initial first-run snapshot to execute a rollback. If this snapshot is detected, the utility will revert the system to its original pre-installation state. If the snapshot is missing, the process will automatically terminate to prevent system instability.
Without a valid snapshot, a clean rollback cannot be performed. In this scenario, you must manually resolve the conflict, restore from a full system backup, or initiate a fresh installation. Note that while the recovery process leaves $WinIDSRoot and $TempDir untouched, performing a new installation will permanently delete all data within the $WinIDSRoot directory.
Data Integrity
The System Restore feature is intended for configuration recovery and is not a replacement for a comprehensive backup solution. System Restore services are set to manual and toggled as needed. Windows Restore Points are transient and may be purged during routine maintenance cycles if those services are running.
Environmental Constraints & Best Practices
Server Deployments: Windows Server architectures do not natively support System Restore points. This feature is automatically bypassed during server OS deployments.
PulledPork Rule Maintenance
The original PulledPork by Shirkdog is housed within a sophisticated wrapper, accessible via the WinSnort Start Menu. While the utility is designed for out-of-the-box functionality with no manual configuration required, the wrapper offers a highly verbose interface with integrated system checks. Every update attempt is documented in the PulledPork log folder. To maintain system stability, the utility automatically rolls back to the last known-good rule set if an update fails.
The Rule Updater includes a built-in scheduler with configurable intervals ranging from 15 to 60 minutes. It supports automated retention of successful updates and SMTP email notifications. While Silent Mode is available for remote or unmanaged sensors, the updater defaults to a verbose display if launched manually from the desktop while in Silent Mode. If executed in Silent Mode without SMTP, the system continues to capture errors and failures within the local log files.
Phase IV: Post-Deployment Management
Upon successful completion, the WinIDS Management Suite will be accessible via Start Menu > WinSnort. Core utilities include:
• WinIDS Console : Real-time telemetry, event monitoring, and analysis. • Rules Updater : PulledPork-driven rule-set synchronization. • System Restore : System Restore Point (SRP) utility (workstation only). • Database Utility : Database maintenance utility. Although a system reboot is not strictly mandatory, it is recommended to ensure all environment variables are refreshed. Please note that the WinSnort Start Menu group may not appear until a system restart has been completed.
=============================================================================== TECHNICAL DOCUMENTATION & SUPPORT: https://winsnort.com ===============================================================================- 0 Downloads
Updated -
=============================================================================== WinIDS v4.1 Deployment Framework – Standalone Sensor Install Guide Copyright © 2026 WinSnort.com | Michael Steele =============================================================================== Operational Overview
This package contains a specialized deployment framework for the Windows Intrusion Detection System (WinIDS). It is engineered for high-performance installations on Windows 10/11 and Windows Server (2016–2025) 64-bit.
Phase I: Pre-Deployment Specifications
• Target Environment : Optimized for clean OS installations. • Archive Integrity : Extract all package contents to a dedicated directory. • Archive Security : w1nsn03t.c0m Phase II: Standalone Sensor Deployment
Locate the config.conf file in the local extraction directory on the host.
Open it with a text editor (such as Notepad) and configure the following variables:
$TempDir = "" # Path for temporary installation/download files (e.g., "D:\files") $WinIDSRoot = "" # Primary home directory for WinIDS installation (e.g., "D:\home") $Oinkcode = "" # Your 40-character Snort.org Oinkcode for rule updates $SensorName = "" # Unique name for this host sensor (e.g., "HostName") $EnableAllRules = $true # Set to $false to disable rule testing and high-volume logging $EnableRestorePoint = $true # Set to $false to skip System Restore point creation $SnortUser = "snort" # Master host ALERT database username $SnortPass = "l0gg3r" # Master host ALERT database password $RootUser = "root" # Master host (root) MySQL/PostgreSQL database username $RootPass = "d1ngd0ng" # Master host (root) MySQL/PostgreSQL database password Save all changes to config.conf and close the editor.
Right-click Installer.exe and select Run as Administrator to begin the installation.
Phase III: Parameter Configuration
Security Recommendations
The username and password values shown above are defaults. For production environments, it is strongly advised to update these credentials to enhance network security. If there is any doubt, leave them as-is.
Database Roles
The SnortUser/SnortPass credentials are used by Barnyard2 to authenticate with the ALERT database. These credentials also facilitate the connection between remote nodes and the master host across the LAN or WAN.
The RootUser/RootPass credentials are administrative and used for command-line database management post-installation, as well as for the Database Manager utility.
Documentation
Use caution when modifying default settings. Ensure all changes are recorded for future administrative reference.
Deployment Duration Estimates
Completion times vary based on the selected database engine and host operating system. The following estimates assume standard network throughput and hardware resource availability:
Workstation (standalone or node deployments): ~15 minutes Server host deployments: ~40 minutes Performance is directly influenced by available system resources and network bandwidth.
Recovery and Resiliency Logic
The WinIDS framework is designed with automated resume capability. In the event of a package acquisition failure, manually download the required asset to your defined $TempDir and re-initialize the installer. The framework will automatically detect the local file and resume deployment.
Important: Do not terminate the installer during active system modifications or registry updates to prevent system corruption.
System Restore Operations
In workstation environments, when EnableRestorePoint is active, the installer generates a system restore point prior to setup. This process initializes the required snapshot services, clears existing restore points, and creates a fresh baseline snapshot before cycling the services back to manual. This specific sequence ensures the first-run pre-installation snapshot remains protected from automatic purging.
If a valid first-run snapshot is already present—often the result of a previous removal via the RestorePoint utility—the installer will bypass the creation step to preserve the original baseline for the new installation.
System Recovery Process
The RestorePoint utility relies on the initial first-run snapshot to execute a rollback. If this snapshot is detected, the utility will revert the system to its original pre-installation state. If the snapshot is missing, the process will automatically terminate to prevent system instability.
Without a valid snapshot, a clean rollback cannot be performed. In this scenario, you must manually resolve the conflict, restore from a full system backup, or initiate a fresh installation. Note that while the recovery process leaves $WinIDSRoot and $TempDir untouched, performing a new installation will permanently delete all data within the $WinIDSRoot directory.
Data Integrity
The System Restore feature is intended for configuration recovery and is not a replacement for a comprehensive backup solution. System Restore services are set to manual and toggled as needed. Windows Restore Points are transient and may be purged during routine maintenance cycles if those services are running.
Environmental Constraints & Best Practices
Server Deployments: Windows Server architectures do not natively support System Restore points. This feature is automatically bypassed during server OS deployments.
PulledPork Rule Maintenance
The original PulledPork by Shirkdog is housed within a sophisticated wrapper, accessible via the WinSnort Start Menu. While the utility is designed for out-of-the-box functionality with no manual configuration required, the wrapper offers a highly verbose interface with integrated system checks. Every update attempt is documented in the PulledPork log folder. To maintain system stability, the utility automatically rolls back to the last known-good rule set if an update fails.
The Rule Updater includes a built-in scheduler with configurable intervals ranging from 15 to 60 minutes. It supports automated retention of successful updates and SMTP email notifications. While Silent Mode is available for remote or unmanaged sensors, the updater defaults to a verbose display if launched manually from the desktop while in Silent Mode. If executed in Silent Mode without SMTP, the system continues to capture errors and failures within the local log files.
Phase IV: Post-Deployment Management
Upon successful completion, the WinIDS Management Suite will be accessible via Start Menu > WinSnort. Core utilities include:
• WinIDS Console : Real-time telemetry, event monitoring, and analysis. • Rules Updater : PulledPork-driven rule-set synchronization. • System Restore : System Restore Point (SRP) utility (workstation only). • Database Utility : Database maintenance utility. Although a system reboot is not strictly mandatory, it is recommended to ensure all environment variables are refreshed. Please note that the WinSnort Start Menu group may not appear until a system restart has been completed.
=============================================================================== TECHNICAL DOCUMENTATION & SUPPORT: https://winsnort.com ===============================================================================- 1 Downloads
Updated -
=============================================================================== WinIDS v4.1 Deployment Framework – Standalone Sensor Install Guide Copyright © 2026 WinSnort.com | Michael Steele =============================================================================== Operational Overview
This package contains a specialized deployment framework for the Windows Intrusion Detection System (WinIDS). It is engineered for high-performance installations on Windows 10/11 and Windows Server (2016–2025) 64-bit.
Phase I: Pre-Deployment Specifications
• Target Environment : Optimized for clean OS installations. • Archive Integrity : Extract all package contents to a dedicated directory. • Archive Security : w1nsn03t.c0m Phase II: Standalone Sensor Deployment
Locate the config.conf file in the local extraction directory on the host.
Open it with a text editor (such as Notepad) and configure the following variables:
$TempDir = "" # Path for temporary installation/download files (e.g., "D:\files") $WinIDSRoot = "" # Primary home directory for WinIDS installation (e.g., "D:\home") $Oinkcode = "" # Your 40-character Snort.org Oinkcode for rule updates $SensorName = "" # Unique name for this host sensor (e.g., "HostName") $EnableAllRules = $true # Set to $false to disable rule testing and high-volume logging $EnableRestorePoint = $true # Set to $false to skip System Restore point creation $SnortUser = "snort" # Master host ALERT database username $SnortPass = "l0gg3r" # Master host ALERT database password $RootUser = "root" # Master host (root) MySQL/PostgreSQL database username $RootPass = "d1ngd0ng" # Master host (root) MySQL/PostgreSQL database password Save all changes to config.conf and close the editor.
Right-click Installer.exe and select Run as Administrator to begin the installation.
Phase III: Parameter Configuration
Security Recommendations
The username and password values shown above are defaults. For production environments, it is strongly advised to update these credentials to enhance network security. If there is any doubt, leave them as-is.
Database Roles
The SnortUser/SnortPass credentials are used by Barnyard2 to authenticate with the ALERT database. These credentials also facilitate the connection between remote nodes and the master host across the LAN or WAN.
The RootUser/RootPass credentials are administrative and used for command-line database management post-installation, as well as for the Database Manager utility.
Documentation
Use caution when modifying default settings. Ensure all changes are recorded for future administrative reference.
Deployment Duration Estimates
Completion times vary based on the selected database engine and host operating system. The following estimates assume standard network throughput and hardware resource availability:
Workstation (standalone or node deployments): ~15 minutes Server host deployments: ~40 minutes Performance is directly influenced by available system resources and network bandwidth.
Recovery and Resiliency Logic
The WinIDS framework is designed with automated resume capability. In the event of a package acquisition failure, manually download the required asset to your defined $TempDir and re-initialize the installer. The framework will automatically detect the local file and resume deployment.
Important: Do not terminate the installer during active system modifications or registry updates to prevent system corruption.
System Restore Operations
In workstation environments, when EnableRestorePoint is active, the installer generates a system restore point prior to setup. This process initializes the required snapshot services, clears existing restore points, and creates a fresh baseline snapshot before cycling the services back to manual. This specific sequence ensures the first-run pre-installation snapshot remains protected from automatic purging.
If a valid first-run snapshot is already present—often the result of a previous removal via the RestorePoint utility—the installer will bypass the creation step to preserve the original baseline for the new installation.
System Recovery Process
The RestorePoint utility relies on the initial first-run snapshot to execute a rollback. If this snapshot is detected, the utility will revert the system to its original pre-installation state. If the snapshot is missing, the process will automatically terminate to prevent system instability.
Without a valid snapshot, a clean rollback cannot be performed. In this scenario, you must manually resolve the conflict, restore from a full system backup, or initiate a fresh installation. Note that while the recovery process leaves $WinIDSRoot and $TempDir untouched, performing a new installation will permanently delete all data within the $WinIDSRoot directory.
Data Integrity
The System Restore feature is intended for configuration recovery and is not a replacement for a comprehensive backup solution. System Restore services are set to manual and toggled as needed. Windows Restore Points are transient and may be purged during routine maintenance cycles if those services are running.
Environmental Constraints & Best Practices
Server Deployments: Windows Server architectures do not natively support System Restore points. This feature is automatically bypassed during server OS deployments.
PulledPork Rule Maintenance
The original PulledPork by Shirkdog is housed within a sophisticated wrapper, accessible via the WinSnort Start Menu. While the utility is designed for out-of-the-box functionality with no manual configuration required, the wrapper offers a highly verbose interface with integrated system checks. Every update attempt is documented in the PulledPork log folder. To maintain system stability, the utility automatically rolls back to the last known-good rule set if an update fails.
The Rule Updater includes a built-in scheduler with configurable intervals ranging from 15 to 60 minutes. It supports automated retention of successful updates and SMTP email notifications. While Silent Mode is available for remote or unmanaged sensors, the updater defaults to a verbose display if launched manually from the desktop while in Silent Mode. If executed in Silent Mode without SMTP, the system continues to capture errors and failures within the local log files.
Phase IV: Post-Deployment Management
Upon successful completion, the WinIDS Management Suite will be accessible via Start Menu > WinSnort. Core utilities include:
• WinIDS Console : Real-time telemetry, event monitoring, and analysis. • Rules Updater : PulledPork-driven rule-set synchronization. • System Restore : System Restore Point (SRP) utility (workstation only). • Database Utility : Database maintenance utility. Although a system reboot is not strictly mandatory, it is recommended to ensure all environment variables are refreshed. Please note that the WinSnort Start Menu group may not appear until a system restart has been completed.
=============================================================================== TECHNICAL DOCUMENTATION & SUPPORT: https://winsnort.com ===============================================================================- 2 Downloads
Updated -
=============================================================================== WinIDS v4.1 Deployment Framework – Standalone Sensor Install Guide Copyright © 2026 WinSnort.com | Michael Steele =============================================================================== Operational Overview
This package contains a specialized deployment framework for the Windows Intrusion Detection System (WinIDS). It is engineered for high-performance installations on Windows 10/11 and Windows Server (2016–2025) 64-bit.
Phase I: Pre-Deployment Specifications
• Target Environment : Optimized for clean OS installations. • Archive Integrity : Extract all package contents to a dedicated directory. • Archive Security : w1nsn03t.c0m Phase II: Standalone Sensor Deployment
Locate the config.conf file in the local extraction directory on the host.
Open it with a text editor (such as Notepad) and configure the following variables:
$TempDir = "" # Path for temporary installation/download files (e.g., "D:\files") $WinIDSRoot = "" # Primary home directory for WinIDS installation (e.g., "D:\home") $Oinkcode = "" # Your 40-character Snort.org Oinkcode for rule updates $SensorName = "" # Unique name for this host sensor (e.g., "HostName") $EnableAllRules = $true # Set to $false to disable rule testing and high-volume logging $EnableRestorePoint = $true # Set to $false to skip System Restore point creation $SnortUser = "snort" # Master host ALERT database username $SnortPass = "l0gg3r" # Master host ALERT database password $RootUser = "root" # Master host (root) MySQL/PostgreSQL database username $RootPass = "d1ngd0ng" # Master host (root) MySQL/PostgreSQL database password Save all changes to config.conf and close the editor.
Right-click Installer.exe and select Run as Administrator to begin the installation.
Phase III: Parameter Configuration
Security Recommendations
The username and password values shown above are defaults. For production environments, it is strongly advised to update these credentials to enhance network security. If there is any doubt, leave them as-is.
Database Roles
The SnortUser/SnortPass credentials are used by Barnyard2 to authenticate with the ALERT database. These credentials also facilitate the connection between remote nodes and the master host across the LAN or WAN.
The RootUser/RootPass credentials are administrative and used for command-line database management post-installation, as well as for the Database Manager utility.
Documentation
Use caution when modifying default settings. Ensure all changes are recorded for future administrative reference.
Deployment Duration Estimates
Completion times vary based on the selected database engine and host operating system. The following estimates assume standard network throughput and hardware resource availability:
Workstation (standalone or node deployments): ~15 minutes Server host deployments: ~40 minutes Performance is directly influenced by available system resources and network bandwidth.
Recovery and Resiliency Logic
The WinIDS framework is designed with automated resume capability. In the event of a package acquisition failure, manually download the required asset to your defined $TempDir and re-initialize the installer. The framework will automatically detect the local file and resume deployment.
Important: Do not terminate the installer during active system modifications or registry updates to prevent system corruption.
System Restore Operations
In workstation environments, when EnableRestorePoint is active, the installer generates a system restore point prior to setup. This process initializes the required snapshot services, clears existing restore points, and creates a fresh baseline snapshot before cycling the services back to manual. This specific sequence ensures the first-run pre-installation snapshot remains protected from automatic purging.
If a valid first-run snapshot is already present—often the result of a previous removal via the RestorePoint utility—the installer will bypass the creation step to preserve the original baseline for the new installation.
System Recovery Process
The RestorePoint utility relies on the initial first-run snapshot to execute a rollback. If this snapshot is detected, the utility will revert the system to its original pre-installation state. If the snapshot is missing, the process will automatically terminate to prevent system instability.
Without a valid snapshot, a clean rollback cannot be performed. In this scenario, you must manually resolve the conflict, restore from a full system backup, or initiate a fresh installation. Note that while the recovery process leaves $WinIDSRoot and $TempDir untouched, performing a new installation will permanently delete all data within the $WinIDSRoot directory.
Data Integrity
The System Restore feature is intended for configuration recovery and is not a replacement for a comprehensive backup solution. System Restore services are set to manual and toggled as needed. Windows Restore Points are transient and may be purged during routine maintenance cycles if those services are running.
Environmental Constraints & Best Practices
Server Deployments: Windows Server architectures do not natively support System Restore points. This feature is automatically bypassed during server OS deployments.
PulledPork Rule Maintenance
The original PulledPork by Shirkdog is housed within a sophisticated wrapper, accessible via the WinSnort Start Menu. While the utility is designed for out-of-the-box functionality with no manual configuration required, the wrapper offers a highly verbose interface with integrated system checks. Every update attempt is documented in the PulledPork log folder. To maintain system stability, the utility automatically rolls back to the last known-good rule set if an update fails.
The Rule Updater includes a built-in scheduler with configurable intervals ranging from 15 to 60 minutes. It supports automated retention of successful updates and SMTP email notifications. While Silent Mode is available for remote or unmanaged sensors, the updater defaults to a verbose display if launched manually from the desktop while in Silent Mode. If executed in Silent Mode without SMTP, the system continues to capture errors and failures within the local log files.
Phase IV: Post-Deployment Management
Upon successful completion, the WinIDS Management Suite will be accessible via Start Menu > WinSnort. Core utilities include:
• WinIDS Console : Real-time telemetry, event monitoring, and analysis. • Rules Updater : PulledPork-driven rule-set synchronization. • System Restore : System Restore Point (SRP) utility (workstation only). • Database Utility : Database maintenance utility. Although a system reboot is not strictly mandatory, it is recommended to ensure all environment variables are refreshed. Please note that the WinSnort Start Menu group may not appear until a system restart has been completed.
=============================================================================== TECHNICAL DOCUMENTATION & SUPPORT: https://winsnort.com ===============================================================================- 4 Downloads
Updated